Saturday, January 04, 2014

Making your own bonsai soil

 I have to totally apologize to my readers as I had written a nice article on making up your own bonsai soil even including pictures of the products and where to get them only to have found out that yes indeed they were available last season but then when I went out yesterday in search of the same products they were not being sold any more at either of the main locations where I had purchased them before and so after some more research I found that I needed to indeed find new materials in general and just try too forget any specific brand names as company's do come and go any more so fast it seems a waste of my time looking for certain brand names.

 Bearing in mind of course that not all of us are living around big city's and sometimes its real hard for us too find what we need and want so to try and make it fairly simple I have put together a pretty basic bonsai mix and you should be able to find all these materials nearly anywhere in the world if you do a little home work and look for them.

 So with that in mind it was back to the drawing board searching out some basic material in my city with out any specific brand names. I did find what I wanted and I'm still going to pass on too you what I consider to be a very basic mix for 90% of all bonsai.

 Now to start with we have what we call Inorganic and there are organic mixes for bonsai . So what is the difference you may ask, good question so here is the answer. An all inorganic mix will consist of only rock like materials such as lava rock, crushed granite, course sands,  or pumice, of course the list can go on and on so the bottom line here is that if you wish to have an all inorganic mix then you do not wish to have any other material in the mix other than a stone or clay based substance and with no organic materials involved at all.

 While yet on the other hand an organic mix will have perhaps some peat, pine park fines, and or some other types of general compost mixed in the mix to help stimulate the plant, acting as sort of a food for the plant. Although your plants truly need none of the later if you fertilize the plants regular during the growing season and you should be doing that anyway.

 What were really trying to do here is create a mix that is fast draining and yet I do not want to sound  contradictory you also need a mix that will retain some of the water and release it later. So a good choice for an Inorganic mix is as follows.

 1: Pumice, or Red lava rock, or Decomposed granite and possibly some course sand if you like or you may in point of fact use all three of the above rock based products as I do and forget the sand.

 Now for an organic mix we will use the same as above and add some sort of pine bark or some people use Orchid bark or other type of compost material but Orchid bark is rather expensive and most people like too keep the cost down and yet still obtain a good result.

  So most other medium grade compost materials will work but bear in mind all of this material should be screened to obtain a uniform size and also to help eliminate the fines and to clean it. Now both mixes organic or inorganic will work for most all of your plants but your conifers will do better in the inorganic mix and your deciduous trees will do better in the organic mix. So then there could be argument as to why we would need both or even use both and to that I will simply say its a matter of choice rather than any necessity.

   I believe that the main thing most of us miss here is that it will depend on where you live and the climate where you live that is going to dictate what you should be using as a mix for your plants. I live in the Great Northwest in the state of Oregon and trust me here in the winter months mother nature is our constant garden hose so the key here is to get all that water out quick so the plants roots can breathe and not rot and so it makes perfect sense that water will pass through a medium based rock substance rather than be left behind in a bunch of organic bark based compost products that will retain a lot of water and stay wet for days or even weeks at a time.

 I personally use for all my tress and plants the inorganic mix and simply fertilize my bonsai on more of a regular regime and for get about the organic materials altogether.

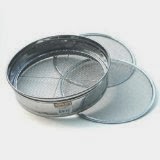
  Now as I stated above you will want to wash all of this material to get out any dusty dirt and or other materials that are not wanted in the mix and then screen it all so you can obtain a good uniform  particle size for your finished mix. I use five gallon buckets and put all my products one in each bucket and then as I dip out each along the way and wash it screen it too get a finished material.

 I save the screened finished material in yet another bucket and what is left over is most often too fine and so it is saved and set aside for later use as a base starter mix for cuttings or seeds.

 Here is a basic set of sifting screens that I use and they consist of three sizes of screens and range from a large screen then medium and then of course a small and I always strive for the finished material to be of a medium size or about the size of a normal pencil eraser or half that size will also be alright in your mix but anything smaller should be passed on to the final screen or have totally passed through and is not wanted in the bonsai mix.

 Once you have all three of your materials in one final bucket then of course mix them all together well and your finished. So once again Inorganic mix is as follows.

 1: Pumice
 2: Red Lava Rock
 3: Decomposed Granite
 4: Optional of course is Small pencil eraser sized crushed rock of any brand or kind and or coarse sand. The mix should be not too large and not totally small either a good gauge is to lay an ordinary penny in or near the mix and the materials used should be about 1/4th the size of the coin. Here below would be what a mix should look like when finished.

  Most all conifers will need to be re-potted about every three to five years depending on the age of the plant younger trees will need to be re-potted more often while yet older trees less often.

 Deciduous trees such as maples flowering and or fruit tress will need to be re-potted every year and or every other year.

 I do not endorse or recommend any pactiular product here and only offer the items that I have wrote about as my choice of material used for my bonsai. Your products can or may be totally different, the choice and final dession is always yours to make as too what you may wish to use for your own bonsai.

 If your unsure or question if the mix is safe or good then I recommend that you only plant a very inexpensive small tree or shrub in the mix first and then follow its progress for at least one entire season and then if your satisfied that your plant survived and is doing well than it would be safe to assume that this mix is safe and can be used on a nearly any bonsai. We would further assume that now our job is done and we need not not use any other materials or search for any other, this is true too some extent however there are other alternatives and or products too research and experiment with and who knows but with time and extermination you may find or stumble on too yet another good bonsai soil mix..

 All of these products should be solid and not deteriorate or break down to any muddy substance and if for some reason they do then you have not washed it proper or purchased something other than what I have mentioned here.

Your end result is to put together a fast draining soil and still have one that will be absorbent enough to retain some of the water being passed through and not totally dry out in at least a day and if it does because temperatures are too hot and your material is drying out too fast then you will need to water more often even perhaps twice in a day in the hotter summer mounts.

Watering bonsai is a very critical factor in there survival or death so if your not sure then feel the soil and if its damp too the touch at the top of your pot then you should be alright and if not then watering may be advised. It never hurts to get your fingers dirty and scratch around a little in the soil the feel will tell you if your doing your job right, dry is a warning sign, moist is good, while mushy or soggy is a sign of too much water so just practice you will get the hang of it.

Thanks, for reading,
By: Harold Yearout ©Copyright 2014 Harold Yearout All Rights Reserved for more information feel free to contact me: h.yearout@gmail.com


Friday, December 27, 2013

The Yixing Tea Pot

 One of my favorite things to collect other than bonsai of course are other Japanese and Chinese items that truly only most collectors would appreciate and collect.

 I have always loved tea and of course I drink it a lot and although I drink mostly organic and or herbal teas as I do not like the caffeine in the teas most commonly found in the local grocery. I do however buy special teas found the world over and enjoy most all of them.

 As a collector I started collecting these special tea pots about two years ago and have several now in my own private collection and enjoy them on display because of some of the truly awesome styles and ornate carvings that they have on them.

 The Yixing Tea Pots originated from china and were made from the clay in the Yixing area in Eastern China in the province of Jiangsu and the clay is sometimes called purple clay and does come from Yixing China.

 These pots and the tea drinking practice from them dates clear back to the 15th century and truly tea drinking personally or as a ceremony can still be found today the world over.

 Although unless you have really deep pockets do not hope to find or buy an original Yixing of that time period any time soon. Although you can still purchase Yixing Tea Pots for your self because they can be found in many different locals all over the world and if you do your own research you will find them.

 I personally will not promote any special place to purchase them or find them here as that is not what I intended in this article, more over I did want to let you know that they are indeed a very nice collectible and that they are in point of fact more desirable for tea drinking than your normal or average tea pot simply because of there unique qualities and ability to absorb the flavors.

 Now what is special about these tea pots you might ask? Well its that being of this special absorbing  clay substance that allows these particular tea pots too absorb the flavor of the tea being consumed from that tea pot.

 It is very important that if you do purchase one for your self be sure only too use one type of tea per pot and never mix or brew any other type of  tea in that pot ever. This will allow that particular tea pot a chance to absorb only the flavor of the tea being used and eventually in time it will permanently do so. Then it will also become seasoned too that flavor and special aroma for the entire time you use it.

 It is said that if indeed you only brew one type of tea for that pot for many years eventually it will take on the flavor all on its own not even requiring that you use tea grounds or leaves any more to brew that tea. Simply add your hot water and let it steep until its ready brewed and then enjoy.

 Although I can not attest to this personally as I have not had any of my pots long enough or ever used them enough yet to have had this so called phenomenon happen. There are people that do swear by it though and say its absolutely possible given time.

 Another way to of course heighten the entire process in my opinion would be to submerge the entire tea pot in the special warm tea in a much larger container so as to cover the entire tea pot in the liquid and then just let it sit for several hours as the clay material from that region is very porous and will absorb naturally any of the flavor and aroma of the teas used.

 Makes sense given the nature of the tea pots made of Yixing clay. Pictured above are some Yixing Tea Pots and styles and this picture is from public domain and not mine. There are many pictures too be found on the internet and so enjoy looking around and perhaps you will find your own special pot and treasure.

 One of my favorite teas in these pots is Money Pod Picked Oolong very expensive tea too say the least given where and how it originated. The monkey picked Oolong tea got its name literary because it was picked by monkeys yes sounds phoney I know but trust me it did actually happen long ago.

 As the monks in areas of China planted the tea trees they never expected the tea trees to grow to such tall heights so as the tea trees continued to grow even taller the monks could no longer pick the most tender leaves and or even begin to reach them.

So guess what?

Well the monks actually trained monkeys to go to the top of the tea trees and pick the most desirable leaves for them and in turn the monks fed and cared for the monkeys so it was a win win for both involved. That then is how we arrived at the name Monkey Picked.

 Now I doubt that this particular practice is still being carried out today by monkeys however we still do have a tea called Monkey Pod Picked Oolong. This is a very fine tea and if you ever get the chance when out and about then try some but this special tea is not to be confused with all the other Oolong teas available. There are cheep Oolongs and there are expensive ones so buyer beware of what your purchasing.

Here are some of my most recent Yixing tea pots purchased. Never mind part of my kitchen stove in the background but anyway this gives you some idea of whats out there to collect and enjoy if you have the desire too.


 Please also bear in mind because of the nature of these special pots never use them in a Microwave oven and do not wash them out with any soap as this will truly destroy the flavor absorbed and ruin the pot for any further use and if by chance you use a tea bag in the place of natural leaves and or products then be sure to remove your tea bag from the pot as soon as it has steeped never leave tea leaves or bags in the pots after use as it will cause mold and also ruin the pot simply let it dry out naturally and then replace the lid and wait till the next use.

 The best natural way to brew special teas for these pots is to heat your water to the desired temperature for steeping the tea and use a glass container of some sort to heat the water in and if you can stay away from your city's tap water by all means use a bottled water for better taste and purity.

 In time when your brewing special teas you will learn that some will need to be hotter than others while some if you get them too hot it will also destroy the flavor and make the tea bitter and not very good tasting at all and believe me it takes a little effort to make just the right pot and get just that right taste but in time you will get the hang of it. Then its all worth it on a cold winters night like tonight to sip a lovely tasting special imported tea as you sit back relax and enjoy your evening.

Thanks, for reading,
By: Harold Yearout ©Copyright 2013 Harold Yearout All Rights Reserved for more information feel free to contact me: h.yearout@gmail.com


Friday, December 20, 2013

Cheif Joseph Pine:

 I decided to purchase an early Christmas present for my self as I do most years. Being alone of course affords me not only the pleasure of doing that, but also gives me more to spend on myself as I have no one else to worry about shopping for.

 The Chief Joesph Pine is a well balanced choice for a small nice compact looking bonsai, this two needle pines habit is naturally tight and of course is always a desired look in bonsai especially for conifers.

 This trees very tight and compact growth can give surprising results fairly fast as a bonsai. Of course with most all pines in order to obtain that desired shorter needle it will take a few seasons of work before it happens.

 Only time and many seasons of needle plucking pinching of the candles and shaping by wiring of the branches will get you your eventual desired affect and look but in time and with a lot of diligence it will and can be achieved.

  It is a two needle growth habit pine and in most cases but not all will grow fairly slow as it only has around a two inch growth spurt each year and will not reach more than usually six to eight foot over all in total height even planted and left too grow in the ground in the garden.

 Bonsai of course allows us to keep the tree small and in the confines of a pot and also allows us to shape it clip it and wire it to the desired creation that pleases us as a bonsai. The Chief Joseph Pine is all ready a dwarf conifer and so in my opinion makes a wonderful choice for a bonsai materiel as it truly is the case for most all dwarf trees and shrubs.

 The typical growth habit for this dwarf tree is green needles in early spring and then turning a golden and or bright yellow in the fall and this most often can be accomplished by giving the tree an ample amount of full sun during the growing season. This in turn will promote the lovely color of bright yellow with hints of orange in the needles of the tree for the fall or winter months and in turn makes this tree a very nice bonsai or even in the ground garden tree to look at and admire in the fall time of the year.

 I have wanted one of these trees for some time however they are hard to come by in my area and most often when you do find an ample supply of them then expect to pay a pretty good price for your plant as they are not at all cheap. The reasons I can give for this are that most often this plant is a grafted tree on too another trunk to make it stronger and that in its self takes time and work and then the color is of course another determining big factor. But most often even the smaller ones that would be suitable for beginning bonsai are in the fifty to sixty dollar price range in a one gallon size pot.

 I have not personally seen any in a smaller size than one gallon but I'm sure they do exist and someone out there is growing them for market some where so do your research and you will find a source as I did.

 Pests for this tree are none known by me personally but there are probably some out there so the key of course as with all plants and especially bonsai is too keep a sharp eye and be very vigilante. If you do decide to create and grow one of these pines as a bonsai first look for a nice healthy tree with some nice placement of limbs for shaping and then a suitable pot for your creation, in this case the pot should be a mat finish pot as in this case the tree I chose is a conifer and that most always is the rule of choice for bonsai conifers, a mat finish pot and deciduous and flowering trees or shrubs should have a glazed pot.

 Of course others are are acceptable but they should at least be in one of the bonsai styles and sizes and not just any old ordinary garden pot.

 Rules of course can be broken but then again most people will at times break the rules as a matter of ease for them selves personally rather than by choice. Say for instance you may not always be able to find the pot of choice so you compromise but its not that big of a deal unless your a stickler for the rules like I personally would be, or unless you were offering the bonsai up for show or sale then it should always follow the rules and be placed in the proper medium and pot before you do show it or sell it, once again only my personal opinion.

 But then again any Master would simply chuckle to himself and or at you either to your face or if not to your face certainly behind closed doors if he or she were to see you planting a bonsai in a nicely finished pot before its time.

 But then again a true Master would tell you the reason for this and explain to you why. However I do not consider myself a Master so again only my advise or opinions are given here, but I personally will always break that one rule and plant my bonsai in a nice pot right away. But then again do not miss understand a working bonsai from say a starter or just a newly started plant most of my personal plants that I have been creating and working on are well over the twenty year mark by now and although some are younger most are that age and even older and deserve a nice pot.

 Pots can always be changed later if indeed they need to be or if you so desire, a different pot can be chosen most any time and you can never have enough pots on hand anyway so if you can afford it then what does it matter? What's all this hype over when the bonsai should be planted in a nice pot anyway?  I simply believe that its my choice to make as to when I give it a nice pot and mine alone to make that decision.

 In my personal collection I have the belief that if I'm going too have this tree in my collection and I'm going to tend it work with it and create it into my desired affect and have in on display in my garden then it deserves a nice pot to add to its overall artistic value and look, end of pot discussion for me personally.


 But then again there are a lot of people that simply will not or have not spent money on pots for there plants until such time as they think that its truly a real show stopper or in the case of the bonsai being in the class of a Master tree or a Specimen plant that is truly deserving of a fine pot.. Pots are not cheap especially the nicer ones for bonsai and it becomes at least for me in my area harder and harder every year to find them.

 Reasons of course are that the best pots are most often imported from abroad and in most all cases the buyer is forced to by an entire container load at a time in order to get any kind of a price break.

 This in turn will also affect the prices you pay and or the amount you may find on the market at any given time in local nursery's and so depending on where you live in the country it can be and often times is a long search and can be daunting one indeed to find nice bonsai pots.

 I have often thought to myself that many years ago I should have also learned and created pottery only for the sole sake and specific reason of making my own bonsai pots... So if your a person that doses have a potters wheel and can throw bonsai pots and perhaps you also have your own kiln and can also burn the glazed pots or perhaps you know someone that does then have them contact me.

 This tree was ready for planting as a bonsai with really very little work on my part other than like I said selecting the proper pot and then positioning it in that pot and wiring it to the pot and wiring the tree its self after it was planted to begin the initial shape and styling.

 This tree is rather young even at around eight years in age and will take a lot of time in shaping and styling too create it into a nice deserving bonsai but in time it will truly be a nice addition to my collection.

Thanks, for reading,
By: Harold Yearout ©Copyright 2013 Harold Yearout All Rights Reserved for more information feel free to contact me: h.yearout@gmail.com


Friday, November 29, 2013

Would it really be Black Friday?

 As usual today was the famous so called Black Friday the biggest shopping day after Thanksgiving Turkey day. I of course just like so many others go out looking for bargains and unfounded treasures but seldom find any. More over I would call it Green Friday as all I or anyone else ever does if there serious about shopping on this famous day is spend the green and so why don't they just call it Green Friday.

 I found $387.00 dollars worth of plants today and some will make nice future bonsai with some time and care, then I bought a nice rectangular mat finish pot for a future bonsai, as the price was right and actually more than likely was truly the find of the day since pots in this area have truly accelerated in price, also I found a really nice tiny pair of very small bonsai shears but they will be absolutely great for getting into the really tight spots..

 I purchased first a very nice Spaan's Dwarf Shore Pine. Now since these particular pines grow very compact and with a small tiny short needle structure and somewhat contorted limbs they most often look like a bonsai before you even lend a hand to them anyway.

 The one I purchased is about two and a half feet tall overall height and is nicely balanced and will make a very nice bonsai with some of my wiring and pruning to get a shape that I like started, but the first step will be to get it into some proper bonsai soil as soon as I can because right now its  potted up very loosely in mostly all bark medium and this if left out in the full exposure to the rainy climate we have here will truly have taken its sever toll by spring and I simply do not want to loose this tree.

 It needs to be in a well drained mix that I can make up and that way it will drain very fast and not hold on too all that water retention and drown the roots.

 Then I bought a very nice little shrub most often used in the garden as just that a true shrub, but I plan to bonsai mine as usual and then train it in some sort of bonsai style. The plant is called Beautyberry Or Callicarpa Bodinieri.

 A very lovely shrub with green leaves in spring and a purple looking berry all over the limbs in the fall.. This hopefully will make a nice bonsai if I live long enough too see the results as this shrub has at present a very small caliper trunk and will take a few years to develop a larger trunk for beauty.

 Even if planted and field grown it would still take longer than I wish to wait to see a finished result in trunk size. So I will look now for a lager one with hopefully the larger trunk and then perhaps just plant this one as a simple garden shrub.

 Unless of course in my many travels around the country and to many nursery's I do get lucky and find one that has a really much larger trunk, but doubtful with out really shelling out a lot of the Black Friday or as I called it the green Friday... MONEY MONEY oh that MONEY...You don't suppose they would consider taking one of the many silver dollar plants I have in trade do ya?     Na I didn't think so.

 The second round of little beauty's I found were two hybrid red pines and they are called  Pinus densiflora Jane Kluis. These guys are grafts and will make some cute bonsai for my garden once I have imparted my handy work on them, surgery if you will... and by pruning them and cutting out some of the limbs then wiring and shaping them to get that initial style created then I will have the great start of indeed yet another fine smaller bonsai for a few years as these plants are still very young and only at this time would be considered nursery stock by most, but then again most people are not looking at them with the intent to create bonsai from them.. Most are at best just looking for another garden shrub around there home or patio.

 Since most of us tend to buy a lot of our material from local of traveled nurseries anyway were not out in the wild gathering bonsai stock. However truly not all of us are Yamadori collectors and just in case you do not know what that means... Well its a collected plant from the wild if you truly get lucky and get the material or in the process of trying to get it do not get thrown in jail or a big whopping fat fine so be careful and get permission if you ever plan to get any material like this for use as bonsai.  Always be sure too ask first before you go just go out digging.. Always remember that land belongs to someone..

 The Red Pines that I bought today are about eight years old each I would guess and in one gallon pots and have the same problem as the Shore pine they are planted in a lousy bark and will retain way too much moisture with this type of mix as a potting medium so I need once again to get them into some proper potting mix as soon as I can.

 Then I bought a really nice light weight rock often called feather rock and it will be used this spring for some plantings actually planted on the rock and these plants will grow on that rock in a way that they are actually growing on the rock and not root over the rock style.  I will write an article this coming spring showing just how I do this and what materials I use and where to get the materials and then I will give you some step by step instructions on how too accomplish this type of a planting  and then of course you will be able too see what the finished product can or could look like.

 Last for today of course but certainly not my last every too purchase was a nice little grafted Pinus strobus Tiny Curls also another Jan Kluis. This little contorted curly needle White pine will also eventually with some tender love and care make yet another addition to my garden as a nice looking bonsai.

 Sorry I do not really have time to take pictures of all this material right now but if you look them up under there names on the internet you will be able to see examples of what they could look like as a finished bonsai.

Thanks, for reading,
By: Harold Yearout ©Copyright 2013 Harold Yearout All Rights Reserved for more information feel free to contact me: h.yearout@gmail.com


Wednesday, November 27, 2013

Praise is due where praise is needed...Scotch Pine

 Although tomorrow is the big day for Turkey and for a lot of you its a chance to have a day with the family and relax and if your still in the work force then of course you get that chance to stay home too and enjoy.. But for me its just another day in the year and I simply could  not resist the temptation of taking a picture of this pine that I was able to work on today in a workshop with a very nice and most enjoyable small group of other people..

 Please excuse part of my kitchen in the back ground but unfortunately I have all ready put away for the season and winter the table I most often use to take photos of my plants on.

 We had the good fortune to have Ted Matson too help us and impart some of his many years well over 35 I believe in the wonderful world of bonsai creating many bonsai and teaching around the country Ted is probably best known for his very creative work on Shohin and deciduous bonsai and Ted is also very knowledgeable of pines and junipers and many other variates of plants in the plant kingdom. Yes fortunate indeed to have such a wonderful person take time out of there very busy day to teach us for over three hours and for this I say praise is due where praise is needed.. Many thanks to you Ted and all who were there and helped out...

 But trust me when I say I was stumped and simply did not know where to begin with this plant it had been left go for a few years and because of the neglect it had branches that needed complete removal and the rest that remained after a serious look and some real hard needle pulling and or pruning left us with some new desirable branches to wire and get started reviving this plant and turning it back into something that can be most rewarding in the years too come.

 In closing I guess I could not let this go with out showing you a picture of the Scotch Pine that Ted helped me with. I only wish that I had taken a picture before the work so you could have seen the real mess and confusion that I faced with this particular plant. 

There is still a long way to go with this one to turn it into something worth really being proud of but one always needs to just move forward and strive to do what needs to be done and I will for sure you can rest assured on that... At least now with the hard pruning this plant will begin to throw back buds and new buds for more future growth and then give me or the next person in line something nice to work with..

This will be the last post more than likely of the year but if I do something else it will be around or slightly before Christmas..

If not well then here is wishing you all a very Merry holiday and a most wonderful New year....

Thanks for reading.
By: Harold Yearout ©Copyright 2013 Harold Yearout All Rights Reserved for more information feel free to contact me: h.yearout@gmail.com


Turkey day tomorrow..

So here we are at another thanksgiving and I will be alone as my family is all gone and passed away over the last few years.. But I will most defiantly have my little Cornish hen and some dressing and mashed potatoes and gravy and perhaps some traditional cranberry sauce. Then I will just kick back and try too enjoy the remainder of the day lamenting over some of this past years blessings and good fortune.

I wish to tell all my readers and bonsai lovers alike here is wishing you all a very happy thanksgiving and I hope your able to enjoy and have a nice relaxing day..

Thanks from me to all of you, Harold Yearout


Wednesday, June 26, 2013

Juniperus rigida bonsai

The genus Juniperus rigdia like all other junipers is in the family of Cypress this particular species is native too northern China, Korea, Japan and the very far southeast part of Russia. It can be used as a shrub or a tree and lives in its native areas in fairly high altitudes it is an evergreen.

This tree or shrub has a very shredded like bark and this can look very nice if used in bonsai and it adds a lot of interest to the trunk of the tree but can in the case of bonsai harbor and hide little pests like bugs and ants and other insects so most often when working one of theses plants into a bonsai most people will peal and work that bark away down too the trunk where you will begin to see the reddish colored trunk appear..

You will of course loose some of the trunks interest but your tree will be much safer from insects and not be as apt to get any fungi and or other pests under the shaggy bark.. I acquired this plant from a fellow bonsai enthusiast and it was a very good price and deal for me as I love junipers anyway and thought it would make a nice little addition to my collection..

The tree is too small in trunk girth to have much of a nebari and is lacking there of and might have been the reason the other fellow did not want to keep it or work it any more.. I will always be the first to agree that a strong and well placed nebari on a tree trunk truly will make the tree shine and look fantastic but some times mother nature just does not give it too us in our life time and so we must settle for less than the best effort and take what is handed to us and try our best to still create something nice to view anyway. Or at least I do. I have often times been accused of not even letting a dandelion die even though it is a weed.

I bought it from him anyway and brought it home and re applied some Lime sulpher to re brighten up the Shari on the trunk and then later that day decided too also give it a nice looking pot. Now I know any master would think that I'm totally crazy and wasting my time by not only working this plant and would truly balk at me for giving it a nice pot but oh well rules are meant to be broken at times and I can not stand any plant in my collection not having a decent pot... Plastic and or wood crates and the like just do not cut it for me...

I have no idea how old this little guy is but not too old I suspect as its trunk size is way too small to have been around for too long.

This juniper like most any other conifer likes well drained soil and lots of full sun if you can provide it and although it will tolerate wet feet too some extent I do not leave it or any of my other plants stay that wet and of course since I do live in the Great Northwest I need not water as much like most others will in there areas as here mother nature provides much rain and remains my constant garden hose most all the time.

Some junipers produce berries and believe it or not the berries are used for spice in a fairly wide variety of food dishes and also the berries are used in some kinds of gin, mostly for a special flavor and it has also been used in certain beers.

Pruning should be carried out in early spring and you can trim or pinch some growth most any time of year but always try to pinch off new growth and stay out of the way of your older wood as it will not grow back to readily in the older areas of the tree or shrub. Re potting of this like most all conifers should be done in early spring before the tree begins too bud up and start any new growth.

Junipers are pretty hardy and strong so you do not have too much to worry about with growing this tree or shrub in your garden or as a bonsai.. Nursery's most often have a wide variety of juniper plants on hand so you should not have any problem at all finding a nice plant to work with and create into a nice bonsai in a lot of different styles.

You could even plant one in the ground for several years taking care to dig it up ever other year or so and cutting back some of the root and also to prevent it from getting too deeply rooted this will of course get you some nice trunk caliper and hopefully a nice nebari to start off with and then when your ready dig it up and benign work on it as a bonsai.

 Jin and or Shari of course is not recommended for the absolute beginner you should wait for this until you have a good total understanding of creating bonsai and then you could play with the idea and use it for its intended purpose and that is hide and or cover up a particular messy part of the tree, or old and or or dead wood, a possible branch that is interesting and has died and most often will just be cut away could instead be made into Jin and add the perception of age to the tree and or add other wise too its over all appearance.

In the case of jin on a bonsai it is a matter of scrapping or pealing all of the bark off in a particular area of the tree and making sure that you have it fairly clean and as smooth as possible and wet too some degree and then you paint on a coat of Lime Sulpher over the area that you wish too have as Jin and it will turn a grayish white giving off the appearance of drift wood or weathered wood too the tree. Be careful and wear goggles and use rubber gloves and also be careful and mindful as to not get any of the sulpher mixture down into your soil as it could or may cause the death of the tree. I usually cover the soil in the pot with some sandwich wrap and or an old towel then begin my work.

The Lime sulpher should be applied once in the spring and then again at or just before fall and then again in the next spring and as needed to keep the gray white weathered appearance after that. A lot of the finer master pieces in bonsai have some areas of the tree or shrub that have been made into Jin.

 It certainly does not need to be done but is a matter of personal preference and or the choice of the creator of the bonsai if he or she wishes to Jin or create Shari on any given tree or not.

Lime sulpher is not expensive and if you grow roses and or any fruit trees it can also be used to control fungi and pests so you can also get the other benefits of this product other than just for bonsai use. And as with any and all chemicals first read and understand the label before using for any application.

Well I'm going to end this article here and hope that you find it helpful even if in the slightest way and please by all means try your hand at creating your own juniper bonsai and who knows it may very well turn out being one of the worlds finer masterpieces..

Thanks for reading.
By: Harold Yearout ©Copyright 2013 Harold Yearout All Rights Reserved for more information feel free to contact me: h.yearout@gmail.com


Tuesday, June 04, 2013

Lions Main Shishi

 Once again as promised here is a picture of my multiple planting of the Lions main or rather the Shishigashira maple.

 There are four Shishi in this planting and more could be added however most likely not...The pot for this planting is 39" inches long by 30" inches wide and 4" inches deep and the largest Shishi is 51" inches in height and with a trunk caliper of 2-1/2 inches at the base This tree was field grown for many years to obtain height and trunk caliper and then planted in this group planting early this spring... Eventually the planting will be refined and some nice moss added to help hold moisture and possibly some other small ground cover plants will be added as I have time.


Thanks for reading.
By: Harold Yearout ©Copyright 2013 Harold Yearout All Rights Reserved for more information feel free to contact me: h.yearout@gmail.com

Tuesday, April 30, 2013

The Chinese Elm for bonsai
Ulmus Parvifolia

 The Chinese elm is more than likely a very good choice for the beginning bonsai artist as it is very forgiving to a point and pretty easy to train. It can be trained in almost all of the bonsai styles other than up right as the plant is very twisty so to speak and does not lend its self to that style very well.

 I personally would choose and informal style or one of  the cascading styles for this plant. The bonsai you see here is one from my own collection and has been in training for about fifteen years now and is coming alone nicely..

 The Chinese elm is a deciduous plant and can be grown either indoors or out, however it will tend to do much better as do most bonsai left out doors. But pay particular attention to the plant in the winter months and protect it from harsh blasts of wind and or frost or any freezing weather as this would truly kill the plant and it would not take long at all over night in fact. So when old man winter gears up more than the usual then take the plant into a safer location indoors but still store it in a some what cooler place.

 I live in the Great Northwest in the state of Oregon and that would be considered zone 8 on the plant scale map and just for all of you that do not know what that is well here is a link below to the best one around that will help you to understand state by state the growing zone for that area.

http://planthardiness.ars.usda.gov/PHZMWeb/#

 As with any bonsai watering is a very important factor and no one plant is the same they all have different watering habits and you will only learn by study and reading and practise. But the general rule with nearly all bonsai is to water every day in the growing season especially in summer when it begins to heat up as the plants are planted in very little soil and have a very compact root system thus eliminating any water fairly fast.

 Over all I use my fingers to tell me and if I push my finger down firmly into the soil at least half an inch or more and it feels dry then its time to water.. The Chinese and Japanese actually use chop sticks made from the softer wood and they will break one in half and use one of the broke half's to test for watering as the sick will absorb the water and leave a moist spot on the sick at the level where water would have been last and if you pull the stick up and check and it seems dried out then its time to water... I just prefer the finger method my self.

 There are also plant meters that you can purchase from local nursery's that will tell you soil reading and dampness levels.... from around $12.00 dollars and up so look for one if you like....But the best practise is to learn your individual plants by heart and there specific watering needs by species and then you will not have any guess work involved.

 The Chinese elm can take the sun as long as you move it out into the sun gradual and not all at once in other words give it a chance to acclimate and then move it on out.. Air flow should be good too and not real windy but normal.

 These plants will need a lot of trimming as they tend to produce a lot of new growth and fairly fast in early spring right on into the summer months... So do not be afraid to give them a hair cut as with any bonsai and the rule here is leave two leaves and trim the third away.. Chinese elm is very twiggy and will produces tons of little twiggy growth all over the plant so once you have began to develop a some what acceptable limb structure on your plant then you will want to strive for branches where the leaves look and grow into a rounded pad if you will outstretched away from the trunk.

 I managed to take many cuttings from this mother plant about 7 years ago and so now have many in my collection that are in starter pots and have been in training for about five of the 7 years and they are also coming alone nicely and will make wonderful bonsai in the future for me to add to the garden or too sell you can see a picture of Chinese elm at the top of the article.

Thanks for reading.
By: Harold Yearout ©Copyright 2013 Harold Yearout All Rights Reserved for more information feel free to contact me: 


Hedge Maple As Bonsai

ACER CAMPESTRE OR HEDGE MAPLE

Hi there all,

 In this article I will try to give you information on what is called the Hedge Maple Or Field Maple.

 This variety of maple is used in many landscape designs and works well in most all public areas like around malls parks center dividers on public streets and the like it is more native to Europe and Asia and many other areas around the globe. In North America thou this maple is known as or called by a more common name Hedge Maple or even Field Maple. Although it is used more commonly in Europe it can still be found here however in nursery's and as I said they are more commonly used in landscape design than for bonsai.

 But as usual I personally will try most any kind of tree or shrub for bonsai simply for not only a learning curve but also to increase my own personal collection. So I was lucky to have picked up some of these little guys at a local nursery and created a grove of them in a bonsai style forest planting or Penjing style if you will.

 Now for all of you that do not know what Penjing is well that is another day or another article but in the mean time if you wish to really know what Penjing is  then Google it...But to make it quick and simple its what is considered multiple plantings or in this case a planting that is more than one tree in the same pot and is often a style of bonsai used more by the Chinese than any other.

 The Hedge Maple has a nice small leaf structure making it a very good choice for a group planting as there always tend to be several trees in any group planting and thus being planted very close together and all growing in the same pot which of course means that we will need room for the top growth and yet do not want it to look overly crowded. So more often than not I personally will choose a shrub or tree that has smaller leaves and a bit of a slower growth habit if used for a forest panting.

 For this planting I choose an oval non glazed pot 12" inches long by 6" inches wide and 2" inches total depth and there are a total of 14 trees in this planting and so far this season all are doing fine.The bark on hedge maple tends to lean towards a gray almost cork fissured look with age and like I said although grown more for an ornamental look it can also of course be bonsai-ed as I have shown here.

 The Hedge Maple is also a hard wood used a lot in the making of furniture and musical instruments.It is very shade tolerant in its early infancy but will tend to need and want more direct light and sun as it grows larger and it does tend to like full sun but be careful and watch what is happening very closely if you keep it in full sun.Full sun is more for a tree in the ground than in a small bonsai pot that will tend to dry out quickly.
 The Hedge Maple if left in the ground and not in a pot can grow to heights of over 25 feet and will make a lovely shade tree and can also be used in nearly any landscape as a hedge if planted close together in rows along fences or driveways or as dividers on property lines, simply use your own imagination if using the trees this way... But they will cluster together nicely making eventually a very nice tight hedge thus of course where the name was derived Hedge Maple.

 But for this article I chose to make a group planting and add several of these small trees to one small pot and then grow them on as a forest planting... The Chinese create most of there bonsai in this style called Penjing. They also of course go a little further than I tend too and add other items to there planting so as to make a scene and this is also nice and makes a very nice looking planting if you have the time and patients to do so..

 Watering for this plant is normal pretty much every day as in this pactiular instance being planted in a very shallow pot it will tend to dry out much faster necessitating a more rigid watering regime. In the hotter weather as spring evolves into summer and things warm up then you will want to be more vigilante and keep your plant well watered and some what shaded from the direct sun as maple tends to burn rather easy and it would not take more than one good hot afternoon to cook your plant and ruin it for sure.

 For soil I use a nice medium mix I personally use for most all of my bonsai three parts plain regular garden soil simply gathered from my own property and one part sand and one part perlite you could of course purchase all of these products from any garden center. Mix all three parts well and then add to your pot as needed during your planting. If  your pot provides extra holes in the bottom of it for wiring then you should of course take advantage of this and wire the trees or tree into the pot so as to prevent it from toppling in the winter and spring wind storms.

 Living in the Northwest we of course tend to get a lot of rain and a lot of these small storms in early spring and of course all winter long and since I do not remove my plants from their garden locations unless the temperatures get into the teens they winter out doors all season and come wind rain or snow they still manage to survive. But some plants can and will be just by the way you plant them rather top heavy so you should alwasys take this into consideration when planting and wire them into the pot if possible.

 But then again as an avid grower of bonsai I tend to be right on top of things during all seasons watching my plants and tending them nearly every day.

 Pests to maple are few so not to much worry there but never the less keep a sharp eye as always its better safe than sorry.  Maple happens to be one of my favorites in the garden and happens to be one of the easier plants to grow and to manage. I grow all of my maples from seed unless I'm picking up a really very good bargain from the local nursery which I might add is not often. Most maples I have or have had around for any time seem to start producing there own seed after they are about eight to ten years old and I gather the seeds in the fall and stratify them and then sow the seeds in the early spring of course to indeed have more maples either for my self or for resale..

 Well not much more I can tell you at this time about Hedge Maple but as always if I pick up on any other good hints or tips about this little plant then I will add them to this post. So have fun with this one and look for some in your local nursery and make your very own Penjing or forest planting.


Thanks for reading.
By: Harold Yearout ©Copyright 2013 Harold Yearout All Rights Reserved for more information feel free to contact me: 


Monday, April 29, 2013


Hi too everyone,

I'm back

All of you that have been on this site or may see this site in the future may or may have not noticed by looking at the dates of my blog posts I have been away for a very long time... Due to some major health issues and family deaths I have not had the time nor the inclination to keep up with the blog...

But a new spring is upon us and I have many new plants and a lot of new additions too my garden and a lot of information to give my readers and perhaps new followers and so I will attempt once again too keep everyone who comes here or reads my posts supplied with new information and hopefully one and all will gain something from it and learn and maybe even have some fun along the way as you follow what will hopefully this time be a long and fruitful blog and I truly hope that the articles and posts that I add here for you will not only inspire you but help you to understand this as possibly one of the most rewarding hobbies in the plant kingdom.

http://thelivingbonsai.blogspot.com

Harold Yearout.


A Red Pine Bonsai

The Red Pine as bonsai.


The Red Pine is of course not the best choice for a beginner to this most rewarding hobby but none the less makes a lovely and wonderful addition to any collection if you have the time and patients to create it..

First of all the Red pine like most all pines is very slow growing so do not expect results fast and if your an elder person too the hobby well then you may want to find a specimen plant to deal with if you do wish results right away, otherwise plan on waiting for many years to get a Red Pine to any size that would be acceptable as bonsai and a tree nice enough too have and too view in your collection.

The Red Pine is of course a native tree to North America and can be found in the forests of many states and could be dug from the wild if you are lucky enough to find a nice one that could be suitable for use in bonsai. Or you could grow one from seed but it would take many years. So if you truly wish to start one to add too your collection then I highly recommend that you find one already growing as nursery stock and work from there.

Red pine is a conifer and has a rather tall growth habit it can grow to a height of any where between roughly 65 feet to over 115 feet if left to grow naturally in the ground but is not a large tree around in diameter only usually reaching around three feet at maximum growth. But however for this article were talking about keeping and growing one as a bonsai so were not worried about the tree ever reaching any height like it would in the wild..

The bark of the red pine has a crackled look in most cases and is fissured and if you look down through it at varying heights on the tree you will see some red appearance thus the derived name Red Pine. Branches on Red Pine are very brittle so must be handled with care if wiring in traditional bonsai forms. The Red Pine will produce cones with age and the cones will have a slight purple look too them when first coming out and of course turn brown with age.
Here is a close up of the trunk of my tree and so as you can see as I described the crackled bark and the red look of the bark, in this case near the base of my tree however this red fissured look will occur all up and down the trunk of the entire tree with age and time...


Like most all trees in the pinus family they are very drought tolerant in the wild and can survive for long periods of time with out water. But they will not of course last at all for any duration as bonsai without you as the care giver being very vigilante and observant with its over all care and especially its watering.

It loves full sun so you should then of course try to find a spot in your garden to provide full sun or at least if not full sun then you should give it at least four to five hours a day of natural sun light. The tree will produce new growth early every spring and this growth is traditionally called candles and in some cases others call them by other names. These candles must be pinched out in late June if you wish not to have them grow on to make more heads on your tree with new needles.

In other words if you wish your trees heads or pom poms as I call them to remain the same size and not get lager or more dense then pinch out the new candles and growth every year as it becomes evident on your tree.

The needles of the red Pine like a whole lot of pinus will be rather long, some where between two and three inches in normal growth but as with all bonsai if you continue too grow and nurture your tree over many years the needles will eventually be shorter in length witch of course is the desired effect we all are wanting and looking for in most any pine that we create as a bonsai.

 I have seen as an example a Red Pine that was created and grown by a Japanese family for over ten generations making the tree close to 900 years in age when I viewed it in 2006 in Japan and its needles were less than an eight of an inch long. This tree was absolutely one of the most awesome bonsai I personally have ever had the chance to view. This was of course by private invite only and not in some standard nursery..

This Red Pine has been in my own personal collection now for over 14 years and was originally purchased as nursery stock and then field grown for ten years so I could get trunk caliper and then dug back up and re-potted and then worked as bonsai to get what you now see in the present picture above.  Of course as with any bonsai it will always be evolving and changing in size structure and appearance as with any bonsai they are truly never finished.

You could grow any bonsai your entire life time and it would still never be finished and of course this my own  personal opinion

I truly hope that the small amount of information I have given you here is enough to possibly inspire you to perhaps try your hand at creating and growing your very own Red Pine as a bonsai.

Thanks for reading.
By: Harold Yearout ©Copyright 2013 Harold Yearout All Rights Reserved for more information feel free to contact me: 


Thursday, December 18, 2008


Hi to everyone,

Well not to much going on here in the way of bonsai as the Portland area is in a nice winter grip and for the first time in years I moved nearly almost all of my bonsai into an indoors protected area.

For years I have left all of my bonsai out doors and set up in my garden in there various locations and never worried to much about the colder weather and it has been down real low many times past 19 degrees with snow and even ice.

But this year it got even lower than in the past with some nite time temps in the real low teens so I got a little worried and moved them indoors.

We had snow again today and it makes the garden look so pretty and really pristine when that happens. Hope you all enjoy your holidays. So have a wonderful Merry Christmas and and a very happy New Year.

Here is a picture of part of the garden today in lite snow...


Thanks, Harold

Friday, December 12, 2008

Apoligize to all my readers

I wish to apologize to now to anyone that had been reading and or looking at my blog as I have not updated it in over three years. I had some very serious health problems and also some deaths in my family that were very devastating to me and I was simply way to involved in keeping just up with the daily tasks of living and really had no time for any thing else.

But now I seem to have most of it fixed and I'm going to be back up and running as fast as I can and in as full of force as I can. I also wanted you all to know that the space here on Google is pretty limited and so I wont be building a very large site as of yet but it is coming and also I need to wait for some time yet until I can afford all the legal jargon for a full blown web site as I intend to eventually make it into a membership site and sell products there as well as teach and train and have available for download video audio and digital products.

So please bear with me through this time and it will be a very nice site I promise. In the mean time please enjoy the limited site here and my blog on Google.

Thanks, Harold Yearout

Friday, January 20, 2006

THE FORMAL UPRIGHT BONSAI

Possibly one of the most majestic bonsai is the formal upright bonsai. This style is very bold looking with a trunk that is straight up vertical and has a very well pronounced apex.

Nearly all other styles can be somewhat derived form the formal upright bonsai. Some of the best materials for this style are Pine, Spruce, Needle Juniper, Redwood, and False Cypress.

This style of bonsai is the real classic of bonsai and if you’re planting one then you would want it to represent as close as possible the conditions that it would grow under normally in the forest.

Let’s take a look at what makes this tree so special. Out in the forest this tree’s ideal conditions would be a very good amount of rain fall for its water needs and the soil around this tree would be very level. It would also require a good amount of air flow and a good deal of sunlight to induce it to grow well and strong.

This tree would not like a lot of other trees close competing for the same space either so it needs its space. It likes plenty of room for the roots to spread and it doesn’t like rocky conditions around its base.

Ok now that I given you somewhat of an idea of the ideal conditions for this type of tree in the wild forest then let’s take a look at what we will want to do in order to create one as a bonsai for our collection.

First of all I would go out to my local nursery and take a look at what is available to me in the group of trees that I mentioned above here in the article. You should be looking for a tree that has good strong bold roots and you’ll want a tree that has very well pronounced good strong branches.

Your first branch on the tree should always be the strongest and it should begin at about one third the ways up the trunk of your tree from ground level. We want our tree to look like a triangle if we were looking straight on into the tree from the front view.

We want our root display to be very strong and rugged looking for this tree as it will certainly depict a very strong and firmly rooted tree and that’s what we want to convey to the onlooker.

We want our tree to have branches that work there way up the tree so that we could climb the tree as if it had steps on each side of the tree in other words I want my branches from left to right on my tree to be nearly at the same height and be directly across from each other moving up my tree towards the top of the apex.

You will want to be selective of the type of pot that you use for the final home for this type of tree. You want a pot that of course has plenty of room for the roots to spread and you want a pot that usually has straight sides and you do not want a pot that is to ornate or distracting with a lot of design.

You want a pot that if at all possible will be rectangular in shape and you want a pot that has nice looking but still fairly simple feet. You want pots that have subdueed colors and not ever fired to a glaze.

I may decide at some point later on after my tree is well established that I want to Jin part of the uper trunk to inhance age in my tree and if you so desire you can preform this work on your tree. I will write an article on this procedure at a later time as it is rather involved.

But if in the mean time you simply can’t wait to find out what is involved then there are books and articles on the net about this subject. Pretty much in a nut shell the art of Jin is to make your tree look much more aged by methods of carving or otherwise preparing some part of the trees trunk or a branch or branches by a method of bleeching out the wood to give it an appreance somewhat like driftwood.

Thanks, for readingBy: Harold Yearout©Copyright 2006 Harold Yearout All Rights Reserved For more information feel free to Contact Me:

Wednesday, December 28, 2005

The joys of a table top fountain


The Joy of a table top fountain

One of my favorite things everyday as I work in my office is the fact that I can listen to the soothing sounds of water trickling out of the dragon's mouth and then dropping down onto some pebbles continuing on into the main pool of water. This is just one of my favorite table top fountains

I have always enjoyed fountains in my main garden at home but just recently I decided that I would add a table type fountain to my office at work and enjoy the sounds of the water all day as I work.

My job requires that I process and do a lot of paper work every day and most of the work is done on the computer. However this work at times can be very boring and take up a great deal of my time.

To help relax me and to help break up the silence of the day I keep my fountain running and it really has made a difference.

I'm lucky in a way I guess because I do not share my office with anyone and I have it all to myself. I do not work in an environment of the cubicle office like so many office workers do. My office is rather large and I have it filled to nearly capacity with indoor bonsai plants and other items that I enjoy.

Many have remarked about my office looking like a small nursery and I just laugh because to me they are just my plants and I enjoy having them around me all the time to see and tend to when I'm not working.

But I guess to my coworkers and others that have visited my office it probably does look very over crowded with bonsai plants as there are nearly forty of them in my area at work in various places.

I guess the point of all this is to tell you that if you can at all get your boss to let you add one of these small table top fountains to your work area then by all means do so as they are very relaxing and help the day go by. Not to mention they add a little beauty and also help to personalize your work area.

Most of the table type fountains usually have a little room left over where you can add some plant life to it and that will also begin to create a better effect for you and your passers by to enjoy.

There are many to choose from in the market place and styles and designs are most often of a personal preference. You could spend hours looking for the right one and in doing so pass many different ones by. But when you do see the one you fall in love with you will most likely just have to have it as these little fountains are almost always an impulse buy.

Since I'm into bonsai and frogs are part of the culture with the Chinese and Japanese so I most recently choose a fountain that displayed frogs and I love it. Of course dragons are also a part of the culture in some ways so I also enjoy my main fountain that has two bowls and a dragon in the center that dispenses the water.

I just yesterday added my new frog fountain as it is a little smaller than my dragon fountain and fits wonderfully on my desk right where I hear it well and also so that I can view it.

These fountains need not be expensive you can pick up a nice one in many shopping areas for under fifty bucks and get a life time of enjoyment out of your investment.

If you would like to see the frog table top fountain then I have added a picture to this post for you to view. If you like this fountain and would like to have one then contact me I can get one to your door in most parts of the country for $46.95 like I said under fifty bucks and that includes shipping and handling.

This style frog and lily pad designed fountain comes with pump and UL approved cord the decorative stones are not included. The size is 11 1/2" x 10 1/2" x 7" high. Four froggy friends grab a cool drink of water from the cup of a lilypad leaf. A treat to behold indoors or out! Pump included. The material is Alabastrite. Ul recognized. 11 1/2" x 10 1/2" x 7" high.

If frogs are not your cup of tea then by all means keep looking till you find your favorite table top fountain and then grab it up and enjoy it because there really is something about hearing the sounds or water moving that will do wonders for your day trust me about this one.

Just to let you all know this will be my last post for the year 2005. My first article for the year of 2006 will be the creation of an upright bonsai one of the main styles of bonsai.

I look forward to writing many new articles for you in the coming year and I hope you enjoy the Living Bonsai and More and will return often to read my ramblings and posts.

Here is wishing each and every one a very happy NewYear and a very fantastic 2006.


Thanks for reading and viewing.
By Harold Yearout

Thursday, December 22, 2005

Abundance of Golden gate Ficus


Hi to all of my readers I have put together a very special offer for all of you that might be interested in getting started with collecting bonsai.

I have this year a real over abundance of Golden Gate Ficus and I need to make more room in my green houses.

So my need to make this necessary room can be your opportunity to get one of these plants that have been trained already for nearly seven years.

Although it is too late now to get one for the Christmas season you can still get one for your self or a friend and enjoy it for years to come.

I have taken a picture here of what these plants look like but please remember that each plant is in a way almost like a person and they all have there own slight differences. They vary little from plant to plant and the plants will not be much at all different from the one you see here in this picture.

Your plant might be larger but never smaller and it could vary slightly in the trunk curve and be even more curved for added beauty. What may be different if anything at all might be the pot size and color as I have so many of these Ficus that I could not possibly take a picture of each one.

So you may see a blue pot in the picture but you may receive a plant that could very well be in a brown pot or a tan colored pot or green you get the idea. The picture here simply can not do justice to what these wonderful Ficus are really like and the beautiful looking markings in the trunks and the fantastic bright green of there leaves.

With your added attention and continued care these Ficus plants will grow on to be one of your favorite bonsai in time and surly they will command the attention of anyone who sees one of these plants in your collection.

If you are at all interested in getting one of these plants then contact me with your shipping details and I will ship one to you as fast as possible. Usually from the time I get the order and the plant gets into your hands takes about a week and a half total turn around time.

I only ship a couple of days during the week so as to avoid any time that the plants might get held over a weekend sitting in a UPS truck or warehouse in which case they might dry out and then it would not arrive to you in the best of health and so I always ship as fast as possible and most of the time by three day air select.

One of these Ficus can be shipped to you including shipping and handling for only $44.95 and believe me that's a real bargain as these Ficus are about 7 to 10 years old and even if I do toot my own horn I think that there just absolutely beautiful.

Your plant will be delivered to you packaged carefully to avoid any spilliage of the earth it is potted in and to you will also receive plant care instructions for your plant.

Thanks for taking a look and have a wonderful and healthy holiday and return as always in 2006 for more articles and bargains on my favorite of all plants the wonderful living bonsai.

Oh and PS: If you would like to really ensure that your plant gets delivered right into your hands at your door step then it is wise to require a signature other wise UPS will simply drop the package at your door and drive a way.

If this is not practical because you may be at work and not at home then simply ask your employer if you can have it delivered to you at your work place. This would also alleviate the need for your signature.

UPS now charges $2.00 more per package for required signatures. The package is automatically insured so no worry there.

Respectfully yours, Harold Yearout

Contact me at h.yearout@gmail.com with the subject line of purchase bonsai:

Tuesday, December 20, 2005

Creating your very own wild flower garden

Creating your very own wild flower garden

A wild-flower garden has a most attractive sound. One thinks of long tramps in the woods, collecting material, and then of the fun in fixing up a real for sure wild garden.

Many people say they have no luck at all with such a garden. It is not a question of luck, but a question of understanding, because wild flowers are like people and each has its very own personality.

Please be aware that what a plant has been accustomed to in nature it desires always. In fact, when removed from its own sort of living conditions, it most often sickens and dies.

That is enough to tell us that we should copy nature herself. Suppose you are hunting wild flowers. As you choose certain flowers from the woods, notice the soil they are in, the place, conditions, the surroundings, and the neighbors.

Suppose you find dog-tooth violets and wind-flowers growing close together. Then place them the same way in your own new garden. Suppose you find a certain violet enjoying an open situation; then it should always have the same conditions in its new garden. I hope you see the point, I’m trying to make here.

If you wish wild flowers to grow in a tame garden then make them feel at home. Cheat them into almost believing that they are still in their native haunts.

Wild flowers ought to be transplanted after blossoming time is over. Take a trowel and a basket into the woods with you. As you take up a few, a columbine, or a hepatica, be sure to take with the roots some of the plant's own soil, which must be packed about it when replanted.

The bed into which these plants are to go should be prepared carefully before you make your trip to collect. Surely you do not wish to bring those plants back to wait over a day or night before planting. They should go into there new quarters at once. The bed needs soil from the woods, deep and rich and full of leaf mold.

The under drainage system should be excellent. Then plants are not to go into water-logged ground. Some people think that all wood plants should have a soil saturated with water. But the woods themselves are not water-logged. It may be that you will need to dig your garden up very deeply and put some stone in the bottom.

Over this the top soil should go. And on top, where the top soil once was, put a new layer of the rich soil you brought from the woods.

Before planting water the soil well. Then as you make places for the plants put into each hole some of the soil which belongs to the plant which is to be put there.

I think it would be a rather nice plan to have a wild-flower garden giving a succession of bloom from early spring to late fall; so let us start off with March, the hepatica, spring beauty and saxifrage.

Next comes the month of April bearing in its arms the beautiful columbine, the tiny bluets and wild geranium.

For May there are the dog-tooth violet and the wood anemone, false Solomon's seal, Jack-in-the-pulpit, wake robin, bloodroot and violets.

June will give the bellflower, mullein, bee balm and foxglove. I would choose the gay butterfly weed for July. Let turtle head, aster, Joe Pye weed, and Queen Anne's lace make the rest of the season brilliant until frost.

Let us have a bit about the likes and dislikes of these plants. After you are once started you'll keep on adding to this wild-flower list.

There is no one who doesn't love the hepatica. Before the spring has really decided to come, this little flower pokes its head up and puts all else to shame. Tucked under a covering of dry leaves the blossoms wait for a ray of warm sunshine to bring them out.

These embryo flowers are further protected by a fuzzy covering. This reminds one of a similar protective covering which new fern leaves have. In the spring a hepatica plant wastes no time on getting a new suit of leaves. It makes its old ones do until the blossom has had its day.

You will find hepaticas growing in clusters, sort of family groups. They are likely to be found in rather open places in the woods. The soil is found to be rich and loose. So these should go only in partly shaded places and under good soil conditions. If planted with other woods specimens give them the benefit of a rather exposed position, that they may catch the early spring sunshine.

I should cover hepaticas over with a light litter of leaves in the fall. During the last days of February, unless the weather is extreme take this leaf covering away. You'll find the hepatica blossoms all ready to poke up their heads.

The spring beauty hardly allows the hepatica to get ahead of her. With a white flower which has dainty tracings of pink, a thin, wiry stem, and narrow, grass-like leaves, this spring flower cannot be mistaken. You will find spring beauties growing in great patches in rather open places. Plant a number of the roots and allow the sun good opportunity to get at them. For this plant loves the sun.

The other March flower mentioned is the saxifrage. This belongs in quite a different sort of environment. It is a plant which grows in dry and rocky places. Often one will find it in chinks of rock. There is an old tale to the effect that the saxifrage roots twine about rocks and work their way into them so that the rock itself splits.

Anyway, it is a rock garden plant. I have found it in dry, sandy places right on the borders of a big rock. It has white flower clusters borne on hairy stems.

The columbine is another plant that is quite likely to be found in rocky places. Standing below a ledge and looking up, one sees nestled here and there in rocky crevices one plant or more of columbine. The nodding red heads bob on wiry, slender stems. The roots do not strike deeply into the soil; in fact, often the soil hardly covers them.

Now, just because the columbine has little soil, it does not signify that it is indifferent to the soil conditions. For it always has lived, and always should live, under good drainage conditions. I wonder if it has struck you, how really hygienic plants are? Plenty of fresh air, proper drainage, and good food are fundamentals with plants.

It is evident from study of these plants how easy it is to find out what plants like. After studying their feelings, then do not make the mistake of huddling them all together under poor drainage conditions.

I always have a feeling of personal affection for the bluets. When they come I always feel that now things are beginning to settle down outdoors. They start with rich, lovely, little delicate blue blossoms. As June gets hotter and hotter their color fades a bit, until at times they look quite worn and white.

Some people call them Quaker ladies, others innocence. Under any name they are charming. They grow in colonies, sometimes in sunny fields, sometimes by the road-side. From this we learn that they are more particular about the open sunlight than about the soil.

If you desire a flower to pick and use for bouquets, then the wild geranium is not your flower. It droops very quickly after picking and almost immediately drops its petals. But the purplish flowers are showy, and the leaves, while rather coarse, are deeply cut. This latter effect gives certain boldness to the plant that is rather attractive.

The plant is found in rather moist, partly shaded portions of the woods. I like this plant in the garden. It adds good color and permanent color as long as blooming time lasts, since there is no object in picking it.

There are numbers and numbers of wild flowers I might have suggested. These I have mentioned were not given for the purpose of a flower guide, but with just one end in view your understanding of how to study soil conditions for the work of starting a wild-flower garden.

If you fear your results, then take but one or two flowers and study just what you selected then you can move on to others. Having mastered, or better, become acquainted with a few, add more another year to your garden. I think you will love your wild garden best of all before you are through with it. It is a real study, you will see once you try.

Thanks for reading.
By Harold Yearout

Creating a Raft Syle Bonsai

Nearly any species of tree could be used for a raft style bonsai but you’ll have more luck if you stick with material that is as pliable as possible.

Simply because you will need to bend and push things around quite a bit when you’re creating your raft style bonsai you'll be working with the tender limbs and trying to position them and move them where you want them as much as possible creating less work in the long run.

Some good sound choices for this style of bonsai would be yew, pine, or perhaps even Japanese maple or you might want to try an elm. There are others that would work and have worked but these would be my first choices and especially for the beginner creating this type of bonsai for the first time.

You will want to hunt for a tree that is fairly tall as this will afford you a fair amount of limbs to choose from and understand that you will only be using one side of your trees limbs for the raft so look for the side that has the most suitable limbs in your opinion as this side will be your raft.

Now we will want to trim the entire tree and then after words remove the limbs from the opposite side of which we chose to be our raft. Now lay the tree down on to a bed of soil in a fairly over sized planting box. Be sure to leave your tree still in its original pot and soil.

At this point it should resemble a row of trees pointing upwards from your remaining branches.

Now you will want to make cuts into the cambium layer of your tree trunk at about 1 inch intervals and then try to insert a small pebble to hold this area open a bit and also dress these scars with a rooting hormone powder. This is perhaps the hardest part of creating your raft planting.

Now your ready to remove the pot from the base of your tree and then tie in the roots of the tree to your planting box then cover up the trees branch as though it were the trunk for all of your trees because really it is.

However above the soil it really will resemble a group or row of trees at this point and this is the effect your trying to create.

Cover about two inches of soil over the trunk and then you can begin to wire the limbs if you want at this point and try to keep your biggest and most heavy looking limbs towards the front and the smaller limbs at the back this will add perspective to the entire planting.

Once you have this all accomplished and hopefully nothing has gone wrong and your tree is planted then all you need to do is sit back and wait for roots to form along the cuts that you made in the cambium. This could take a long time perhaps even a couple of years.

During this time take especially good care of this tree as you want to have success with your new raft planting. Keep it shaded in the hot days of summer and mist it regular and also feed as with any other bonsai.

It takes a long time to develop any good bonsai and especially one that is good looking and attractive. So just work with it and treat it like any other of your bonsai and you should have success.

In the mean time you can be thinking of how you want the whole raft to look after it is has grown for a season or so and is well established. Once it has its new root system developed then you could remove the old root and begin thinking of a pot that will work for your new loved bonsai.

Now of course pot selection is always a matter of preference and choices can be varied but you’ll at least want a pot that is large enough to give your bonsai room for expansion and yet not be out of proportion to the tree.

I like to choose either a nice large round shallow pot or one that is oval if possible or even better yet if you can afford it a nice slab type container would even be better.

Once I have selected a nice container then I will wait till the right time of year preferably spring and then I will replant my entire raft of trees in its new pot and then begin my real magic of creating it into the look of a landscape.

I will cut out some of the branches now to enhance a look of distance between trees and I will add moss where I can and then perhaps a small rock or two to add to the effect.

I will then train each individual limb as it were a completely separate bonsai tree and in time work at developing trunk and canopy accordingly for each tree in the raft.

As you work with your bonsai don’t be in hurry as it will most likely take you another couple of years to really begin to see the look of a small forest of trees but it will happen with time and your creative ability.

Thanks for reading.
By: Harold Yearout ©Copyright 2005 Harold Yearout All Rights Reserved for more information feel free to contact me:

Saturday, December 17, 2005

The Japanese Dwarf Garden Juniper

Better known in the bonsai world as Juniper Procumbens Nana


This lovely shrub is great for bonsai and especially for the beginner its low growing habit is great for creating a cascading bonsai and can be developed in a short time.

This material has been very miss used by many different sellers and other people displaying starter bonsai and even beyond in malls and other places where you might not normally expect to find bonsai for sale.

Good bonsai are normally sold by nurseries or people that specialize in this type of plant material and not in some mall out in the middle isle from a booth.

Don’t get me wrong sometimes you may find a really good buy in one of these types of places but most often I would be very careful.

Most of these sellers will simply slap one of these tiny starter plants into a pot and then call it bonsai. Buyers beware.

Such is not the case. It takes a few years to develop a nice bonsai and even with this material you’ll spend some time and have1 to do your homework if you really want to create a nice one.

This material however can make a wonderful bonsai and can be accomplished with very little efforts on the grower’s part if only you will follow a few simple guide lines.

Look for a plant in a nursery that is from five to seven years old and that has already been established and grown some nice branches for you to choose from and work on.

You can expect the price to be from around $9.95 when on sale to somewhere around $25.00 depending on the size of the plant and the amount of growth it has developed.

These plants can be found in nearly any fine garden establishment around the entire world.

If you want to work on your plant such as wiring or training of the branches this is best done in the fall when the plant goes dormant. If you do wire or train at other times of the year you will have to be very vigilante that you do not scar your bark and break the branches.

The branches will then have all winter to become accustomed to there new position. You will want to keep up with regular pinching of new growth of these plants during the growing season and please do pinch out the new growth and do not cut it out with scissors as this will turn your needles brown and make your plant look unsightly.

Pinching only encourages the plant to grow more vigorous and it will be come a lot more compact and not nearly as leggy looking on your branches.

All you need to do is grasp the new growth between your fore finger and your thumb and slightly twist and the new shoot will easily break away from the mother plant.

Eventually your aim is to try and create pods as I call them and let these cascades down for a very nice visual appearance. In other words a nice looking branched cascading arm with clusters of rounded or an elongated looking pods.

Fertilize your plant from early March till June and then stop feeding as you will not want to risk fertilizing this plant in the heat of summer as you may kill it.

The Juniper will tolerate full sun and can go a little on the dry side but as with all bonsai you will never want your plants to completely dry out; this simply is not good at all for any bonsai and most often will spell disaster.

The juniper likes to be sprayed or misted every day during the normal growing season from around June till September and in most areas it will begin to start its winter nap during the month of late October or even in to November.

You will need to repot your bonsai about every one to two years and at repotting time you will want to gradually remove about one third of the entire root growth but not at all once.

Do this over say two or three years and then once you have a nice established plant you’ll only need to transplant it about every five years or so.

Do not keep these plants indoors for long periods as they are indeed an outdoors bonsai. Others will try to convince you that it will simply grow just fine indoors. I’m here to tell you they are wrong.

Plants that are used to being out doors all the time simply will not do well indoors that’s just the way of it. By bringing those into your home you’re setting up a almost instant death for the plant.

These plants are simply used to being outside in the elements rain, wind, cold, and the like and once they acclimate to these types of conditions and then you try and change the conditions by bringing the plant in doors you will most often kill your plant.

This is not to say that you can’t bring your plants indoors for a short while to enjoy them because you can. But then you must return them to the garden or patio or where ever you’re growing them outside or expect disaster.

If you’re interested in trying your hand at one of these fairly simple to grow and tend bonsai then I would recommend that you get a nice starter from your local nursery during the growing season, or you may wish to get one from an auction if you do not want to wait. Or you can purchase a plant that is already growing and been pre trained to some extent.

Here is an auction link for you to take a look at if you want a plant you can hold over till spring and then begin work on, just click the link to take a look at this material. Simply click on the link below.

Click here to see the auction

If you want to perhaps purchase a plant that has already been established and some what pre trained then look at my link below. At my link you can take a look at a couple of plants that I have for you. Clik the link below to view the material.

http://www.bonsainmore.com


Thanks, for reading
By: Harold Yearout
©Copyright 2005 Harold Yearout All Rights Reserved For more information feel free to Contact Me: